Customising Windows 10 Desktop
It is a good idea to customise Windows 10 to your personal preferences and needs.Add Tiles to Start Menu
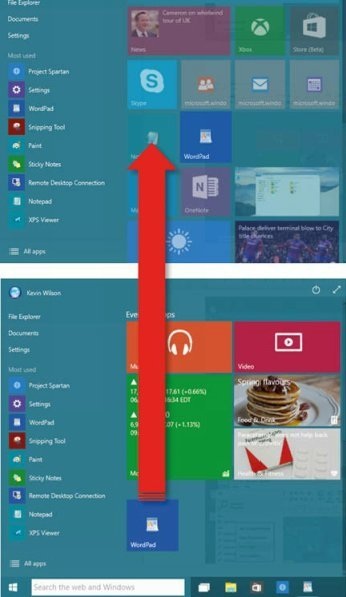
You can add tiles by dragging the icon off the list of apps on the left hand side of thestart menu as shown below.

A good tip is to only drag your most used apps to tiles on your start menu. In this
way you can build up a start menu where you can easily access all the apps you use the
most without having to scroll through apps on your start menu. This is particularly
useful if you happen to have a lot of apps installed on your machine.
If the app you want to add to your start menu is not listed, you can search for it
using the search field on your start menu.
In this example I want to add the app called ‘wordpad’ to the start menu. I can
search for it using the search field. When windows finds the app it will list it under a
heading called ‘Apps’.
Right click on the app icon and from the menu that appears select ‘pin to start’

Move Tiles on the Start Menu
You can move tiles by clicking and dragging them to a new position. The tiles willscroll automatically as you drag your tile up and down the menu
If you are on a touch screen device tap and hold your finger on the tile for a second
then drag your finger up the screen to the position you want your tile.
Remove Tiles from Start Menu
You can remove tiles you don’t use by right clicking on the tile and selecting ‘unpinfrom start’

If you are on a touch screen device, tap and hold your finger on the tile until the menu
appears.
Resize Tiles on Start Menu
You can resize tiles on the start menu by right clicking on the tile and selecting resize.You will see that each tile as a number of pre-set sizes (small, medium, wide & large).

Select the size from the drop down menu.

If you are on a touch screen device, tap and hold your finger on the icon and select
resize.
No comments:
Post a Comment